The captured data can be exported to a file in ASCII format for further analysis or documenting purposes. DigiView provides three export methods to choose from with each method having a few unique features. These features are documented in the next three sections:
▪Exporting All Signal Data (Raw)
Properties common to all three export methods are discussed below.
|
|
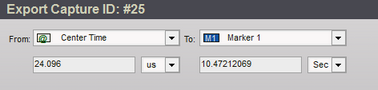
Time Range
Select the Starting time and Ending time of the data to export. You can select from several predefined time points (i.e. Data Start, Data End, Trigger, Marker 3, Center Time, etc) or select Custom to manually enter the time.
File

Below the Time Range options, the file name and path for the export file will be displayed. To change the name or location, chose the Destination button (to the right of the filename). You can chose any valid storage device for your system including a Network Drive, Floppy Disk, FLASH Memory, etc.
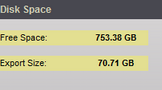
Estimated Free Disk Space
The available space of the export destination is calculated and displayed here. The available space will be calculated whenever the destination changes. While the export is in progress, this will be updated to keep you informed of remaining space. If the available space becomes too small for the remaining portion of the export, then the export will automatically finish without exporting the rest of the data.
Required Disk Space
The amount of disk space required to hold the exported data will be displayed here. Since all storage devices require a minimum amount of space to hold a file, the minimum file size will be shown if the exported data is smaller. If the export size is very large, the background color of this display will turn to yellow. If the export size exceeds the available space on the storage device, the background color will turn to red. Even though the estimated size is larger than available space, you can still perform the export which will automatically halt when disk space becomes critical. The export size will be calculated whenever any option or the destination changes.
Progress indicator

The lower left portion of the Export dialog will display the progress of the export. The progress display will indicate the number of bytes already exported, the percentage of the data already exported and the number of bytes per second being written to the storage device.
Stop Button
The export can be canceled at any time by selecting the Stop button. All data exported up to the point of cancellation will be available in the exported file.
Export Button
After selecting the desired export options, choose this button to begin the export. This button will be disabled while an export is in progress.
Export+ Button
After selecting the desired export options, choose this button to export all Capture History files from the current capture to the most recent capture. When exporting is completed, the current capture is reloaded. This button will be disabled while an export is in progress.
Export++ Button
After selecting the desired export options, choose this button to export the entire Capture History. When exporting is completed, the current capture is reloaded. This button will be disabled while an export is in progress.
Close Button
To exit the Export window, choose this button. If an export is in progress, the export will be canceled automatically.