

To change Acquisition options, select the Project Configuration Options button from the main toolbar (highlighted above) then select the Acquisitions Tab.
Auto Run Pause
Selecting this option will add a pause between Auto Run captures instead of immediately beginning the next capture.

Display Behavior after New Capture
These options control the default behavior when a new capture is displayed. This includes newly captured data and data loaded from browsing through the Capture History.

Do Not Change Position - When selected, the current time reference point remains the same. The Waveform Views will remain at their current time reference instead of scrolling to the trigger point or a selected marker position. NOTE: List windows always adjust to the time of the closest matching line of data, so they may change position slightly, based on the new data loaded.
Scroll to Trigger - When selected, the waveform windows will scroll to the trigger point.
Scroll to Marker - When selected, the waveform views will scroll to the chosen marker. After this option is selected, the Marker Selection options are available to make the marker selection.
Capture History Options
These options control when to save captures to the history, the amount of storage to use and determine what action to take if these settings are exceeded. Changes to most of the options below require pressing the "Apply" button in order to reconfigure the history buffer. If this is required, the buttons will highlight with a red border to notify you. Pressing the "Cancel" button or leaving the Acquisition option window (when the buttons are highlighted) will discard any changes and restore your previous settings. When the apply button is pressed, the history will be reconfigured to the new settings and the database rebuilt. If needed, some files will be deleted to meet the new settings, starting with the oldest captures first.

Save capture History - When selected, each capture is stored in the history unless overridden by a plug-in or Auto Search window.
Do Not Save capture History - When selected, each capture is discarded when a new capture is acquired unless overridden by a plug-in or Auto Search window. When this feature is off, the Capture History bar provides a "Save This Capture" button for manually saving a capture to the history (see Capture History).
Delete Capture History - When pressed, all capture history files for the current project will be deleted, including the one being viewed. When opening a project file that does not have any history, the data stored within the project file will be saved as a history file. If history files exist for the project, but the current data is not found in the history, the data will be added to the history at the proper chronological position.
Delete Bookmarked Captures - When pressed, all Bookmarked capture history files will be deleted. All other files will be retained.
Delete Displayed Capture - When pressed, only the current loaded capture will be deleted. All other files will be retained.
Keep Bookmarked Captures, Delete the rest - When pressed, all capture history files will be deleted except the ones that have been Bookmarked.
Keep Displayed Capture, Delete the rest - When pressed, all capture history files will be deleted except the current loaded capture.
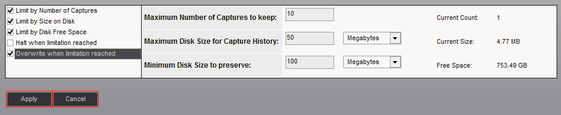
Limit by Number of Captures - Select this option to specify the exact number of captures to keep. Once selected, the number of captures can be specified in the Maximum Number of Captures to keep edit box.
Limit by Size on Disk - Select this option to specify the size of the storage space to use for the capture history. Once selected, the size can be selected in the Maximum Disk Size for Capture History editor on the right.
Limit by Disk Free Space - Select this option to specify the amount of free space to reserve on the Hard Drive. Once selected, the size can be selected in the Minimum Disk Size to preserve editor on the right.
Halt when limitation reached - Select this option to halt the analyzer if any of the limitations specified above have been exceeded. A warning dialog will be displayed with information on which limit was exceeded.
Overwrite when limitation reached - Select this option to automatically delete the oldest capture(s) to make room for the newest capture when any of the limitations specified above have been exceeded. The history will be maintained as a First in, First out (FIFO) buffer using the parameters specified above. When limitations are reached, no warning is presented as this configuration will automatically maintain the buffer using the specified limitations as new captures are added.
History Monitor - For your convenience, the current Capture Count, Storage Size and Disk Free Space are displayed to the right of the editors. This display is updated as capture files are added or deleted and can be used as a History monitor while capturing.
Apply - When highlighted, a change has been made. Click to save the modified settings.
Cancel - When highlighted, a change has been made. Click to discard any changes and reset to previous values.
(also see: Capture History)